How to create a new [Assignment] in Google Classroom
Google Classroom is a great Learner Management System (LMS) filled with functions to help teachers and students manage school work and save time. It can feel daunting to use until you understand the system and have figured out how you want to use it with your students.
I am K-Bo, a user of Google Classroom for more than 2-years, here to share some ideas on how to effectively set up your class on this service.
Worksheets that are graded and used to calculate a student’s final grade can be given as an [Assignment]. Let’s take a look at how to create one from scratch.
How can you create an [Assignment] from scratch?
To create a new assignment, click on [+Create] and select [Assignment] once you enter [Classwork]. Click on [+] ('1’ in image below) and choose the application ('2’ in image below) that best suits the worksheet you want to create.

If you select Google Documents, an untitled document will open. The document will be stored automatically in the class folder on Google Drive.
Make sure to give the worksheet a name since an untiled document will be created each time you create a worksheet.
Once the worksheet is completed, close the application and return to Google Classroom. You need to select how you want to share this worksheet from the three available options.
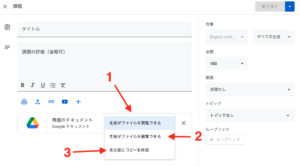
- Students can view file: Students cannot modify the file. Good for reference material and files that need to be printed.
- Students can edit file: All students have access to the same file. If someone modifies the file, everyone can see the change. Good for group work.
- Make a copy for each student: Each student receives a copy that only the student and teacher can access. Good for assignments that need individual grading and feedback.
In my English classes I distribute worksheets that I created on Google Documents by [making a copy for each student]. I can grade and provide individual feedback on each student’s work all in Google Classroom.
Once you have decided how to share the worksheet with your students, set a due date and other settings following the steps below.
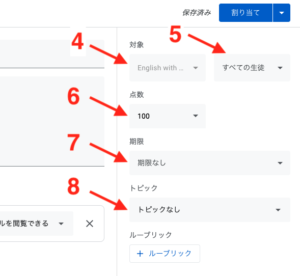
- For: Choose witch classes the assignment is to be distributed to. Yes, multiple classes is possible!
- Students: You can designate certain students if necessary.
- Points: Full score for the assignment.
- Due: Set the date and time the assignment is due. (noon is 12:00PM)
- Topic: Select or create a topic to organize [Classwork].
*If you set grading categories in the class settings, you will see [Grade Category] beside [Points].
*If you select multiple classes in [For], the original worksheet file will only exist in the class folder of the class it was created in.
*You can have separate due dates between the different classes.
To save the assignment, you need to give it a title. This title is what students will see in [Classwork].
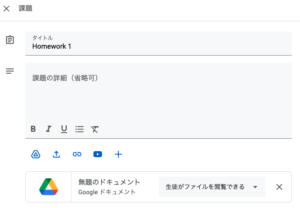
Instructions is not something you must write, but I recommend providing instructions for your assignments.
In my classes the number of times students asked questions regarding assignments dropped quite a bit.
Now that the worksheet is completed, settings set and the title made, you are ready to [Assign] (top right of browser) the assignment. You can also choose to save the assignment if you feel it is not ready yet.
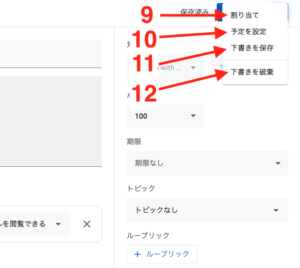
- Assign: Distribute the assignment instantly.
- Schedule: Set a date and time to distribute the assignment.
- Save draft: Save the progress as a draft.
- Discard draft: Delete the assignment draft.
You can modify assignments after they have been assigned, but this should be avoided since it can confuse your students.
If you select [Schedule] an assignment that has a worksheet which is set for [make a copy for each student], the copy will be created when the assignment is distributed. Any changes made to the original document will not be reflected on the student copies after distribution.
Can you attach files made on Microsoft Word or PDF in an [Assignment]?
You can attach and share files that are created with non-Google applications.
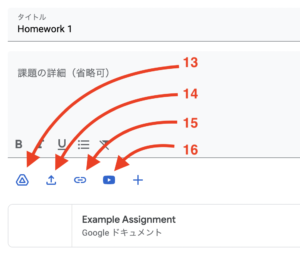
- Google Drive: Choose a file from Google Drive.
- Upload: Choose a file that is not on Google Drive
- Link: Share links to webpages.
- YouTube: Share a link to a YouTube video.
It should be noted that students can access shared files that exist in the class folder on the teacher’s Google Drive. If you share a file from a different location (e.g. dropbox) students may not be able to access it.
Worksheets created on non-Google applications require extra steps when students want to submit their work. To make the Google Classroom student friendly, it is better to avoid non-Google applications.
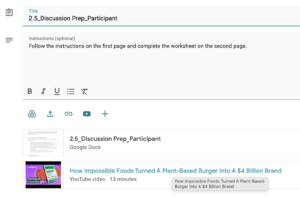
Can multiple files be attached?
You can attach multiple files and links on an [Assignment].
For example, you can include a YouTube video, and a link to a website that students need to view in order to complete an essay.
Be sure to explain the role each file plays for the assignment in the instructions section.
Before I go…
I recomend using [Topics] to organize all your [Assignments]. Depending on how you run your classes, the way to organize your [Classwork] will be different. For some classes, creating topics based on lesson days might be good. For others it might be better to create topics based on due dates or assignment types.
I found it helpful for students to create a document explaining how I organized [Classwork] and how I expect students to interact with it and distribute it as a [Material].